Nextcloudはオンラインストレージのオープンソースウェアです。
Webブラウザからはもちろん、WebDAVやスマホアプリ、デスクトップアプリから利用できるので、使い勝手はGoogle DriveやDropboxとほぼ同等です。
また、アクセス制御や容量の追加が自由にできるので、会社や団体、個人利用での利便性が高いと言えます。
今回はこのNextcloudをDockerコンテナで設置し、ストレージにConoHaオブジェクトストレージ(100G/月450円)を割り当てる手順を紹介します。
※この記事の執筆時点で使用したNextcloudのバージョンは14.01になります。
ConoHaオブジェクトストレージの設定
ここは特筆すべきことはなく、ConoHaのコンパネから容量を確保するだけなので割愛します。
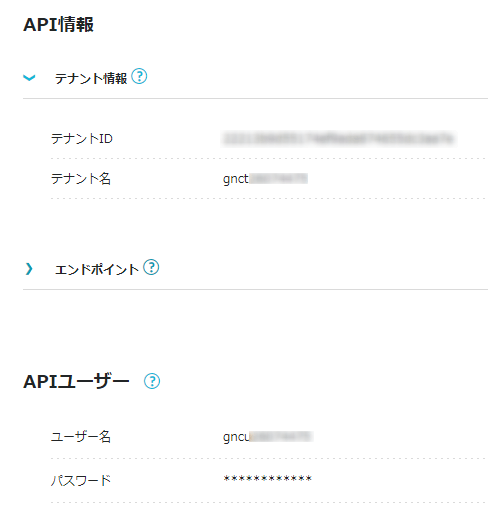
また、APIメニューからAPIユーザーを登録しておきます。
NextcloudをDockerコンテナで動かす
Docker Hubに公式のイメージが置いてあるので、順当にそれを使います。
library/nextcloud - Docker Hub
ドキュメントにDocker Composeの例が載っているので、そのまま使いましょう。
MYSQL_ROOT_PASSWORDとMYSQL_PASSWORDは自分で適当に入れます。その他はお好みでカスタマイズを。
docker-compose.yml
version: '2'

volumes:
  nextcloud:
  db:

services:
  db:
    image: mariadb
    restart: always
    volumes:
      - db:/var/lib/mysql
    environment:
      - MYSQL_ROOT_PASSWORD=password
      - MYSQL_PASSWORD=password
      - MYSQL_DATABASE=nextcloud
      - MYSQL_USER=nextcloud

  app:
    image: nextcloud
    ports:
      - 8080:80
    links:
      - db
    volumes:
      - nextcloud:/var/www/html
    restart: always
とりあえず立ち上げてみます。
$ docker-compose up
localhost:8080にアクセスしてみて、Nextcloudのセットアップページが表示されるのを確認します。
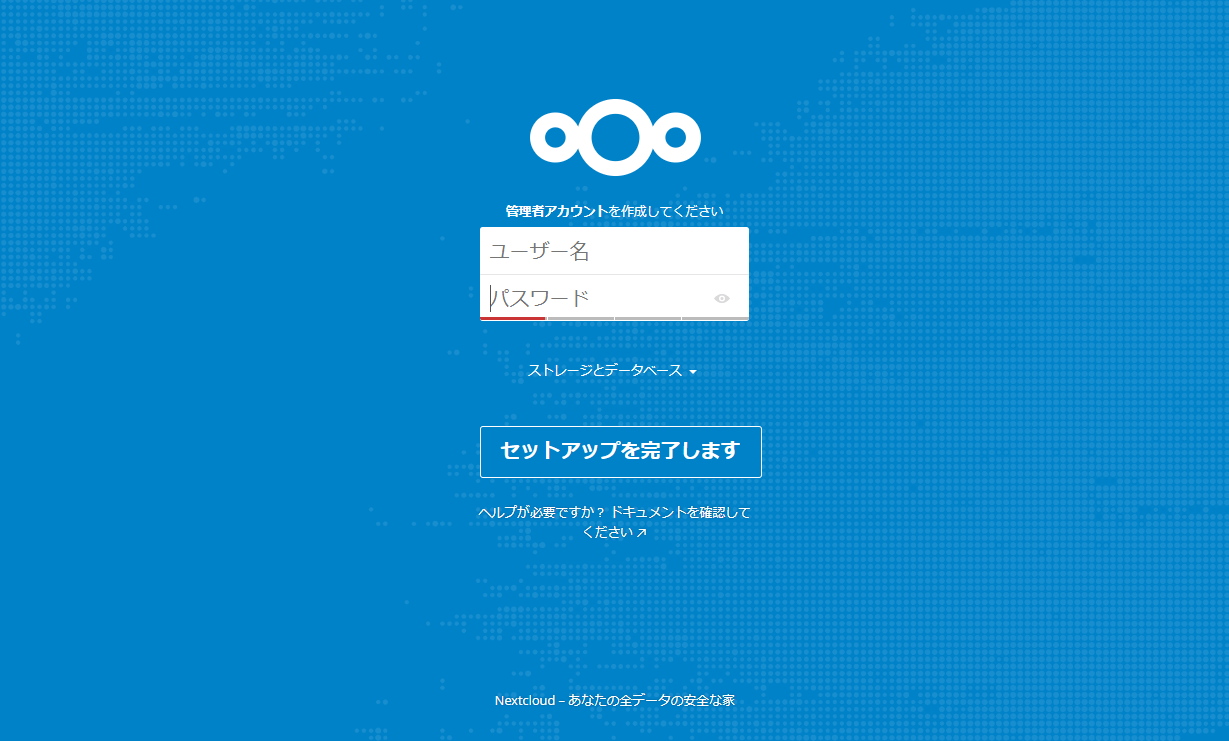
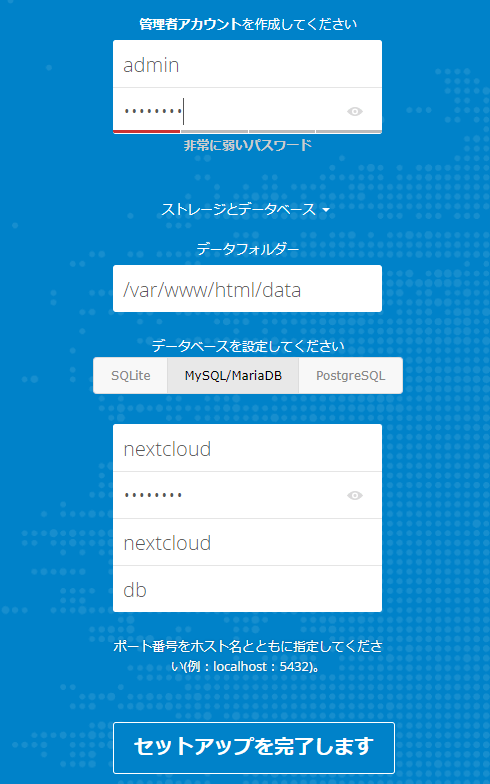
このままだとSQLiteが使用されてしまうので、『ストレージとデータベース』をクリックしてMySQLの設定をして『セットアップを完了します』をクリックでログインします。
オブジェクトストレージとの連携
現在の状態だとオブジェクトストレージとの連携がまだできていませんから、このまま使うとローカルディスクにデータが保存されてしまいます。
なので設定ファイルにオブジェクトストレージの設定を記述します。
コンテナにアタッチする
現在起動中のコンテナにシェルをアタッチしてconfig/config.sample.phpを覗いてみます。
エディタが入っていないぽいので先にインストールしておきます。
$ docker-compose exec app /bin/bash
# apt install vim
# vi config/config.sample.php
するとobjectstoreという項目にswiftに関する設定例が載っています。
'objectstore' => [
    'class' => 'OC\\Files\\ObjectStore\\Swift',
    'arguments' => [
        // trystack will use your facebook id as the user name
        'username' => 'facebook100000123456789',
        // in the trystack dashboard go to user -> settings -> API Password to
        // generate a password
        'password' => 'Secr3tPaSSWoRdt7',
        // must already exist in the objectstore, name can be different
        'container' => 'nextcloud',
        // prefix to prepend to the fileid, default is 'oid:urn:'
        'objectPrefix' => 'oid:urn:',
        // create the container if it does not exist. default is false
        'autocreate' => true,
        // required, dev-/trystack defaults to 'RegionOne'
        'region' => 'RegionOne',
        // The Identity / Keystone endpoint
        'url' => 'http://8.21.28.222:5000/v2.0',
        // required on dev-/trystack
        'tenantName' => 'facebook100000123456789',
        // dev-/trystack uses swift by default, the lib defaults to 'cloudFiles'
        // if omitted
        'serviceName' => 'swift',
        // The Interface / url Type, optional
        'urlType' => 'internal'
    ],
],
これを参考にconfig.phpに追記します。
$ vi config/config.php
とりあえずこんな感じでやってみます。
テナント名やリージョンなどの各項目はConoHaのコンパネで確認してください。
'objectstore' => [
    'class' => 'OC\\Files\\ObjectStore\\Swift',
    'arguments' => [
        'username' => 'gncu00000000',
        'password' => 'xxxxxxxxx',
        'container' => 'nextcloud',
        'objectPrefix' => 'oid:urn:',
        'autocreate' => true,
        'region' => 'tyo1',
        'url' => 'https://identity.tyo1.conoha.io/v2.0/tokens',
        'tenantName' => 'gnct00000000',
        'serviceName' => 'Object Storage Service',
        'urlType' => 'publicURL'
    ],
],
そして、再びブラウザからアクセスしてみると…
Internal Server Error

The server encountered an internal error and was unable to complete your request.
Please contact the server administrator if this error reappears multiple times, please include the technical details below in your report.
More details can be found in the server log.
なんかエラーになります。。。どうやらオブジェクトストレージとの連携がうまくいっていないようです。
ちょろっと調べてみたところ、serviceNameにObject Storage Serviceを指定しても利用されてないっぽいのが原因のようです。(バグかも…)
server/SwiftFactory.php at stable14 · nextcloud/server · GitHub
気が進まないですが、仕方ないのでピンポイントで上記の問題の箇所を修正します。
$ vi lib/private/Files/ObjectStore/SwiftFactory.php
  private function createContainer() {
      $client = $this->getClient();
-     $objectStoreService = $client->objectStoreV1()
+     $objectStoreService = $client->objectStoreV1($this->params)
...
そして、先ほどのconfig.phpにcatalogNameの項目を追加します。
'objectstore' => [
    'class' => 'OC\\Files\\ObjectStore\\Swift',
    'arguments' => [
        // ...
        'catalogName' => 'Object Storage Service',
    ],
],
それからブラウザでリトライ。
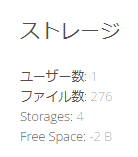
うまくいったのかわかりませんが、デフォルトで置かれてるファイルが消滅し、Free Spaceが-2Bになっています。
念のため確認…
ちゃんとオブジェクトストレージと連携できてるのか怪しいので、確認してみます。
確認にはAPI利用してコンテナの状態を見ます。
swiftコマンドを使う方法もありますが、設定が面倒だし、滅多に使わないのでcurlを使います。
(といいつつ、実際はInsomnia使ってます)
認証トークンの取得
最初にユーザ名とパスワードで認証してトークンを取得します。
ConoHaのAPI情報にある、テナント名、ユーザ名、パスワードを記述したJSONデータをPOSTします。
送信先エンドポイントはリージョンによって異なるので、ConoHaコンパネで各自確認してください。(Identity Serviceに/tokensを足した形になります)
$ curl --request POST \
    --url https://identity.tyo1.conoha.io/v2.0/tokens \
    --header 'Content-Type: application/json' \
    --data '{
        "auth": {
        "tenantName": "gnct00000000",
        "passwordCredentials": {
            "username": "gncu00000000",
            "password": "xxxxxxxxxx"
        }
    }
}
' | python -m json.tool
そうすると長いJSONが返却されるので、最初の方にあるトークンIDをメモっておきます。
{
    "access": {
        "token": {
            "issued_at": "2018-10-01T21:36:20.843522",
            "expires": "2018-10-02T21:36:20Z",
            "id": "abcdef123456789", // <- これがトークンID
            "tenant": {
                "domain_id": "gnc",
                "description": "",
                "enabled": true,
                "id": "xxxxxxxxxxxxxxxxxxxxxxxxx",
                "name": "gnct00000000"
            },
            "audit_ids": [
                "xxxxxxxxxxxxxxxxxx"
            ]
        },
...
コンテナの確認
今度はオブジェクトストレージのエンドポイントをGETしてコンテナが作成されているか確認します。
先ほどメモったトークンIDをX-Auth-Tokenヘッダに添付します。
$ curl --request GET \
  --url https://object-storage.tyo1.conoha.io/v1/xxxxxxxxxxxxxxxxxx \
  --header 'Accept: application/json' \
  --header 'X-Auth-Token: abcdef123456789' | python -m json.tool
以下のようなレスポンスになるはずです。
[
    {
        "count": 96,
        "bytes": 3551549,
        "name": "nextcloud"
    }
]
コンテナはちゃんと作られているようですね。
中身を見る(URLの後ろにnextcloudを追加する)とモリモリファイルが含まれてるのでたぶん大丈夫そうです。
[
    {
        "hash": "f2b7105f7975cd23e86dd70dda5dd519",
        "last_modified": "2018-10-01T22:47:13.658490",
        "bytes": 155095,
        "name": "oid:urn:160",
        "content_type": "text/javascript"
    },
    {
        "hash": "aca3a081a3e53921b66bba74da130b36",
        "last_modified": "2018-10-01T22:47:14.110030",
        "bytes": 1146,
        "name": "oid:urn:162",
        "content_type": "application/octet-stream"
    },
...
以上!
コメント